Sunday, August 25, 2013

Sophie's Quilt - Free-motion success

The next quilt I attempted was based on artwork by Shira Sela. You can find her beautiful work on Etsy here: http://www.etsy.com/shop/shirae. I actually have a print of this piece, and it is gorgeous! When I was looking for my next project, I knew it would be perfect. This quilt was a small wall-hanging, about A3 in size and designed as a textile picture meant for hanging in a child's room.


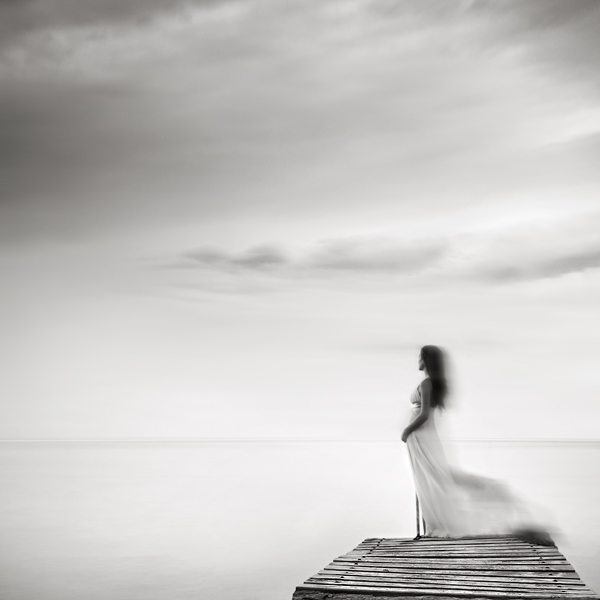
Here is the original art work, as you can see I still keep forgetting to mirror the image. I'm just going to say it's part of my signature technique now ;)


I used the same technique as before, converting the picture into grey-scale and saturating the edges using photoshop. Choosing the colors was a bit more difficult. The original picture has a really serene, washed-out feeling to it. I love this, but wanted to go with something a bit more vibrant, while still maintaining the mystique of the original. The other hard part was choosing the patterns for the fabric, as they needed to be small enough to not detract from the rest of the piece. This greatly restricted the choices I had, and I didn't manage to find the perfect matches for the tree and the fore-ground grassy hill. The tree was too dark, and the grass wasn't quite the right shade and didn't have a prominent pattern. In the end I just had to go with what I could find, as I had a deadline for the quilt.

The piecing for the quilt is very simple. The large pieces are all raw-edge applique: The tree, sun, dresses and hills. I did want to keep the stiffness down though, so the sun and hill pieces surrounding the girl were cut with minimal overlap. The sun is actually comprised of three separate pieces, and it was a bit difficult to line up properly, as I didn't leave enough overlap


In the end, I had to include a slight misalignment on the right hand side. I managed to do it in the least noticeable spot though (in my opinion). Once all the pieces were placed and ironed, I then went back and machine blanket stitched the edges using matching thread so it wouldn't be visible. The black edging covered most if this, and it added to the stability. The extra sewing did fray the edges a bit though, and if I had to do it again I would either use thicker black edging, or consider satin stitching it.

The next step was the embroidery. I started with the girl's hair, as this would be the most difficult part to do. And it was. I ended up having to cut out and redo the hair twice until I found a technique that I liked. What worked eventually was to do the light color first completely, then go back over and pick out the darker sections to highlight the light points. This proved better than doing the opposite. The plaits were particularly hard, as each small stitch needs a different direction and position to portray the segments. The whole thing didn't come together until the black was added either, and it was hard to vision what it was going to be like. I was pretty happy with the result though.


The next step was to do the 'skin' and the doll's hair. I did the hair first, as it's easer to fill-in the skin to a stop point. Once again, nothing really formed until the black was added, and the hands were particularly difficult to get right, but I think the shapes ended up coming out well.


The last bit of embroidery to do was the mushrooms. These were really easy to do, and lots of fun to see shaping up. I'm actually thinking of doing a whole mushroom piece at some point in the future, or at least add mushrooms into future endeavours :)


After all the embroidery was done, I did the black edging for all the sections, and set out to do the quilting. I wanted to see a hint of the quilting on the front, but not for it to detract. To this end I chose threads of similar color to the fabric sections, with a slight gradient difference. Unfortunately I think I matched the color too closely to the green fore-section, and the quilting is difficult to see.

You can see how the parts look from the front in the previous pictures, but here are some more details of the back to fully see the stitching. I didn't use any traced patterns for the piece, mainly because I tried chalk pencils and fading pens, but nothing came up clear enough on the fabric for me to follow.


The forefront had a larger flower/leaf pattern seen above. I really wish I had done this in a more contrasting thread, but you live and learn. The pattern itself was swirly and fun, but it was hard to see as I was stitching it, which made it harder - I stitched this on the front as I needed to see where the boundary was for stopping. It was very difficult to determine where the pattern stopped and started without the contrast. Overall though, this was the first free-motion I did using my new machine and it was so much fun!


I chose a daisy-chain pattern for the middle hill, to give a bit more flowery structure to the section's fabric. and I loved how it turned out! It's definitely the work of a beginner, but I was happy. This time I first stitched the boundary from the front, then turned the piece over to do the stitching from the back. This gave me a better contrast for seeing the stitching, and I was able to do a better job following the pattern. You can also see some of the bark pattern used on the tree to the left here. That proved a bit difficult due to the movement of the tree, but was still fun to do.  The last hill was completed with simple stippling, as it already had a prominent fabric pattern.


This is the entire back. The sun and sky were easy to do, and I tried to use the gradient of the lines on the sky to represent the setting sun. If you want to see this in detail, right-click on the picture and choose "open in new tab" or window. You can then click to view a magnified view. Same for any of the above pictures.

Overall this was a great piece to use for practicing my free-motion skills, and was a lot of fun to create!

Wednesday, August 21, 2013

The Lamb Quilt - Freehand stippling practice

While I was wrapping up the Arboretum quilt, I was considering the idea of doing some of the quilting of it using free-motion. After all the work that went into the quilt however, I didn't want to ruin it and decided to make another quilt specifically to practice free-motion quilting. It was just as well I did, as my first experiment was a nightmare.

I decided to do a simple block pattern using a fat quarter bundle from the Woodland Tails Fabric Bundle (by Sheri McCulley Studios for Riley Blake). The piecing went well, although I did have some alignment issues, and if I had more material I would have lined up all the stripe shapes more consistently.


Overall though, the front of the quilt was quite pleasant to create. Then I started the stippling. It was painful from the get-go. I went through three broken needles, a range of different threads (even Aurifil and Bottom Line) and still I was having nothing but problems. I tried changing and experimenting with the tension, trying different needle sizes, but still the thread was constantly snapping, or worse yet; melting. I was in tears. I thought it must be me, that my technique was all wrong, despite doing exactly what I had seen in videos online. By the time I had completed the quilt, I had sworn off free-motion, and decided to do the Arboretum quilt by hand.


I gave the quilt to my daughter as a crib blanket, and proceeded to finish up the Arboretum quilt. Once that was done though, I decided my next project was going to be another art quilt, and this one would need quite a bit of quilting to make it work. I had to give free-motion another go. I went to my local quilting shop, and asked about the problems I was having, and they simply said "what machine are you using". Yeah, that very simple reason hadn't even occurred to me. I was using a $200 Singer machine, and it just wasn't up to the task. I sat down and tried out some of the machines in the shop, and first try I put out the most amazing, even-stitched and easy to do stippling. Just like I had seen in the videos. I upgraded my machine to a second hand Bernina Aurora 450, and set out on my next project. I haven't looked back since.

Meanwhile, my misbegotten Lamb quilt has proved quite the sturdy blanket for a toddler. With its mish-mash of threads and broken stitches, it has held up surprisingly well, and is still much loved by my daughter. It was great practice, but if someone asked me to do the experience again, I imagine my reply would contain a rather loud amount of expletive expressions :)


P.S. I also made the whale pillow in the above picture. I just couldn't find any pillows that had the right size and loft for a tummy-sleeping toddler. She's now in a big bed, and uses a proper size pillow, but that pillow was great for the transition phase!

Friday, August 16, 2013

Dabbling with Applique - The Arboretum quilt.

The Arboretum quilt was my first experiment with applique, and is probably still my favorite quilt to date. It hangs with pride of place in my living area. Apart from the straight panel stitching, the whole thing was hand sewn, including the embroidery and quilting. All up, the quilt took a little over a year to create from start to finish.


The quilt began with art work by Nicolas Gouny, who created the art for the four panels. For my installation I changed some minor things, including the character in the summer panel, and the order of the panels. I also mirrored the design, but that wasn't entirely intentional.

The preparation work involved deciding how big the piece was going to be, and buying the fabrics. I decided to buy them all at the same time, so I could match each panel to the others and allow the transition of shades through the seasons. The background fabric was almost the hardest to choose, as it was the main element in portraying the feeling of temperature. The Autumn background works particularly well, as it has speckled sparkles that add to the falling leaves design.

Once it was time to start cutting, I transformed the original artwork into a template for the applique pieces. To do this I used photoshop to resize each of the panels into the real size I wanted in inches. I then turned the image into grayscale and added a filter to intensify the edges of each tree, this makes tracing easier to see. At this point, I should have also mirrored the images, but I didn't (and still fail to remember this step). Once the templates have been designed, I print them off in A4 sheets, including as many of the individual elements as I can. The sheets are then stuck on a window to use as a light box, and the fabric stuck on top for tracing. You could also trace onto the double-sided fusible web interfacing using the paper-side as well, which I have done since this quilt.

Ironing on the pieces

Once I had the template traced, I ironed a sheet of fusible web interfacing on to the fabric and cut out each of the shapes. Because I wanted all the panels to line up properly, I laid out each of the panels prior to ironing the applique pieces on. Once I had the positioning correct, I ironed all the shapes from one panel on, and then used that panel to re-position subsequent panels so each of the trees were consistently placed. This was a bit more difficult than anticipated, as the original art-work had slight changes between some of the panels, and I needed to adjust some of my pieces accordingly.

The next step was to sew the edging on the applique. I wanted the edging to stand out, and decided to use a heavy-weight embroidery thread with blanket stitch. The edging really made each of the trees come to life, and differentiated all the greens in particular.

Two of the panels with completed blanket stitching

The main difficulty came with the tree trunk branches, as some of the very thin applique would tear up and peel off when being pierced with the needle (for example the red tree on the left in the Autumn panel). I used back-stitch for the trunks, which was a wise choice in the end, as I was able to 'fill-in' the bits of branches that ripped off with stitching. In future I would try to make the pieces thicker if possible, and definitely make sure to use as thin and sharp a needle as possible for edging.


In these two pictures, you can see a bit more detail of the 'filling in'. Basically the applique interfacing couldn't stick the very small branches on properly, and they would tear when being stitched. I would have to use the thread to effectively push the fabric back on, and in some places replace the very thin edge (this can be seen in the above picture, on the upper curved branch. This is mainly a problem due to the thick embroidery thread used, as the coarseness would pull at the applique as it was being brought back through. Using a very careful horizontal pull-through technique did help with this somewhat. Later I also used a double method of thin thread to hold down, then embroidery thread outside the boundary, but this was very labor intensive.

The blanket stitching of the panels took a very long time, but once they were done it was time to begin the detailing embroidery.


Each panel included a lot of detailed embroidery work, that in my opinion is really what makes it come to life. In addition to the characters, each bit of leaf, flower, snow and mushroom was individually sewn on.


Autumn critter embroidery detail

The embroidery of the characters was difficult due to the small size. It was hard to get the single stitches in just the right position to depict the movement and expressions. There were definitely times that I needed to cut out and re-do an entire figure.


Autumn cat embroidery detail

The back of the Autumn panel, showing all the hand stitching.

Once all the details on the panels were complete, I needed to decide how to bring the panels together. I settled on an order of Summer, Autumn, Winter, Spring, as I felt it showed the progression better, and the more detailed panels would be closer to the viewer's line of eyesight. I wanted to mimic looking out a window with my border panels, and decided on a flat brown fabric. I did a mock-up design with pictures of the panels in photoshop to see how it would come together.


Mock-up of the final piecing.

The sewing of the border panels was the only machine sewing for the quilt (apart from the binding described later). It was painless and came out well, however the panels of brown ended up being too stark, and something else was needed to border the panels. After some experimentation I came up with an embroidery chain pattern to go around each of the panels. This worked well to off-set the brown, but needed something to balance it around the binding. First however, I needed to decide on how to do the quilting.

I really wanted to add a 3-dimensional element to the quilt, so I decided to use a high-loft wadding and hand-quilt around the trees. This definitely made the trees puff, and they almost looked like padded applique. I also quilted around the clouds and characters, as well as the ground.


This covered my 2-4 inch spacing for most of the panels, except the winter one which had a barren sky. In this panel I went back and pulled in each of the embroidered snow drops, making the entire sky pucker. I quite liked how it turned out in the end.


The other panel which wasn't quite covered in the end was the summer panel, and with this panel there wasn't anything already there that I could work with. I decided to try and use the quilting to depict the heat in the air, and quilted a series of wavy lines in the sky.


With the quilting complete, it was time to bind. As I mentioned before however, the detailing around the border for each panel needed something to balance it around the binding. I tossed around the idea of continuing the chain embroidery around the inside of the binding, but decided it would be too busy, and difficult to do once the binding was in place (and hard to bind if I did it prior). After deliberation I decided to do a piped binding, but I wanted it to be framed by having a further stitched binding after the piping.


This proved to be quite fiddly, and the joining of the piping was a bit messier than I wanted it to be. In the end I did get it to work however. I used a corded piping trim and sewed it to the quilt sandwich with a zipper foot as close to the edging as I could get. I then reversed it and sewed my binding strip to the other side. This was difficult, as you need to consistently get very close to the piping or gaps will appear. I ended up hand sewing some of the bigger gaps together. Overall however, I'm very happy with how it turned out.


The quilt ended up being quite a large wall hanging, which goes perfectly with the vaulted ceiling of my living room. This is definitely one piece that I won't be parting with!


Thursday, August 15, 2013

A rendezvous with textiles, part 2.

How would you normally begin a rendezvous? Start with an arranged time, determine the place of meeting? A plan to come together and begin conversation perhaps. My rendezvous began with no plan, more just continuous mutual head-butting until something eventually settled into place. I had found a simple quilt block pattern in a magazine that I intended to use, and set out to determine the color scheme and how to go about creating my masterpiece.

For the quilt pattern I intended, I needed 20 different embroidery blocks. I sorted through the designs available, and found 20 that I believed could be transferred using embroidery. After printing those off, I decided on my neutral color scheme for the block squares, going with a combination of grey, blue and cream. The process involved re-sizing the image that I wanted to use and then printing it off in grey-scale. I used a window (or my laptop screen if it was dark) as a light box to trace the image onto the cotton background material.

Then I started embroidering; and I was truly terrible. As it turned out, my first block also ended up being my last block, as I couldn't handle ruining the final quilt with such shabby work. It was slow going, as each block took hours to design, trace and finally embroider. Once again the blocks were started and put away as the months went by. This time however, I was able to have small milestone victories, as each block was completed. That probably more than anything is what kept me coming back to this new textile experiment.

Then we decided to move across the world. We packed up our meager belongings, and I set out to the United States of America, on my own with a single suitcase. Among the small amount of things we decided to bring to the U.S., those small blocks of embroidery made an appearance. Being able to bring them out to look at and work on made those first few months of being in another country just a little bit more bearable. My confidence with textiles was increasing too, and I decided to make my first quilt for the cold winter months. I jumped on Craigslist and managed to get a chunky 1970's sewing machine for a staggeringly expensive $5. Let the quilting begin!

Getting ready to sew with the beast.

My first quilt was a very simple design based around some amazing Koi fabric I found online. I learned a lot, and in the process managed to make an incredibly cozy blanket that I still use to this day. The color choices still seem to work with all our furniture changes over the years. The practice with panel stitching and layout was particularly important, as my next job would be the culmination of many years work, and I sure needed the practice. The embroidery blocks were slowly but surely starting to add up.

My first ever quilt

The years passed, and we had some incredible ups and downs in our life. Even though I had an increasing number of beautiful embroidered blocks, we still had no child to dedicate it to. Finally though, we were able to welcome into the world our beautiful little girl, and just before she came I finished the last block of embroidery. I ended up with only fifteen blocks, after changing the size of the blocks and the layout of the quilt. I needed to come up with a border for each of the blocks, after I chickened out of my original plan of making each one a circle layout. The difficulty came with my original choice of colors, they were too bland and neutral for a child's room, I needed to add something with a bit of pzazz. After a trip to the sewing shop, I came home with a brave collection of stripes that were to be sewn in a mitered border around each block. I say brave now, but at the time I had no idea how unforgiving stripes are to straight border sewing. Eventually though the quilt came together.

Erin's quilt Larger detailed picture here

Slightly wonky, and still with more muted tones than planned, Erin's quilt came into life. My masterpiece was not how I originally intended it, and was unmistakably home-made, but it was a labor of love that I still gaze at fondly today. In case you're wondering too, the first and last block that I embroidered was the middle second from the top, with the mummy and two baby elephants. Actually, I think that pretty much characterizes my life at the moment!

Next: Dabbling with applique.

Saturday, August 3, 2013

A rendezvous with textiles, part 1.

I waited, skin dimpled in the night breeze. I could feel it deep in the abyss of my heart, tonight was the night. No more waiting, no more hanging on to the slightest hint of a sign. Tonight was the return. I would feel that subtle texture on my fingertips, and I would never let go again.


Just kidding, this isn't that sort of rendezvous. Well maybe a little bit... but only in a metaphorical sense. This is more of a meeting between two compatible parties. Myself, and the world of textiles. As with most stories, this has a beginning and middle. However, I'm hoping the end is not in sight as yet. So that leaves us with a beginning, or a middle. Let's be traditional and start with the beginning, no point in starting waves just yet.

I think many children are introduced to the concept of textiles at an early age. Taught how to sew, knit, embroider, possibly even loom their own fabric. The thrill of creating something from next to nothing is amazing, and the pride of making or fixing their first clothes, pencil case or other project is something that people remember well into adulthood. Like other children, I was taught to sew, not that I ever did. I was given knitting needles and I made the most amazing scarf ever! Well half of one anyway. Maybe a quarter. I was given an amazing Hungarian embroidery kit, with gorgeous flowers and leaves that wound around their own creation. I spent hours working on satin stitch, and filling in those beautiful petals until they rose from the cloth and burst into life. Unfortunately it was more that they puckered into some mimicry of the example embroidery given with the kit. As with the other experiments with textiles, the embroidery got shoved into my cupboard, waiting for me to gather the will to return.


Over the years, textiles continued to call to me, and I would occasionally dabble with a new liaison. There was the discovery of quilting, and my incredibly intricate half finished pillow case. The tangle of fingers and twine when I decided to learn crocheting. The feather yarn scarf, that I handed over unfinished to my mother in law after the third time of unraveling the whole thing. Each time I took up a new project, I remembered all my previous heart-breaks, and the poor abandoned projects left crumpled in my wake. I felt remorse at my neglect, how could I treat these past projects so poorly, and still go back for more. Yet go back I did, and so my sordid history with textiles continued.

Then something happened. One unremarkable day, one I have no memory of apart from it being the beginning something new;  I remembered that Hungarian embroidery kit. I decided to try my hand at embroidery again, but this time, oh this time I was going to be clever. This wasn't just going to be some embroidery, it was going to be a quilt. A quilt for my one-day baby - that we weren't planning on having just yet, but that's OK. It would be a one off masterpiece, not some Winnie the pooh generic piece of cloth. It would be my illusion of grandeur... yes that should probably be delusion of grandeur, but this was an illusion I was determined to make real.

So I searched. I wanted to find that perfect something, the pattern by which I could create. My Frankenstein awaiting electricity. Then I found it, in the form of Ilona Maras. Ilona is a true artist, an illustrator of imagination and charm.


I wanted to capture the love and playfulness of her work, and make it my own with full credit to the original artist. The match was made. My rendezvous had begun, and my previous dalliances would soon turn into a full-blown addiction. Well, if you can call another 3 years later soon that is. But that's a story for another day.

To be continued... soon.
Part two here